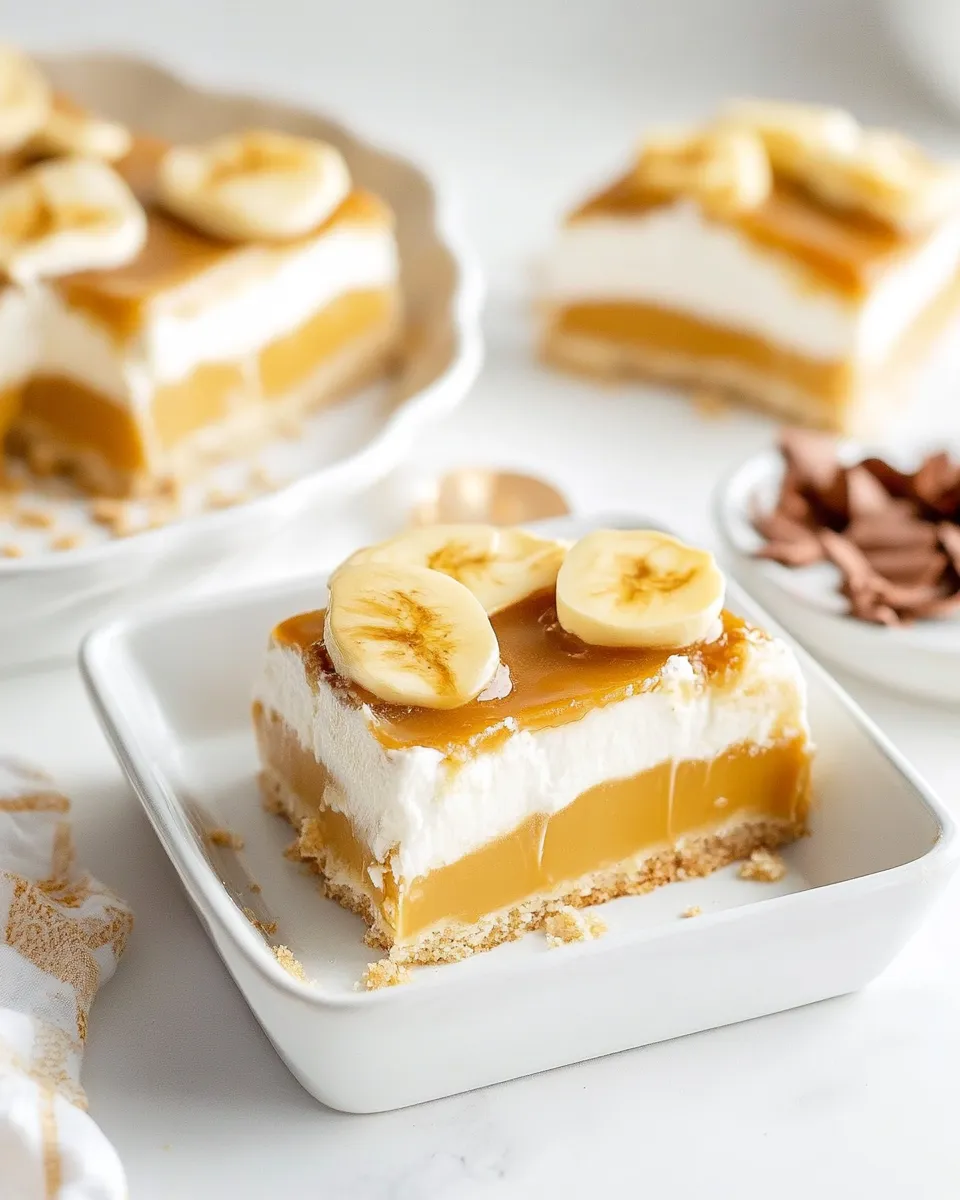
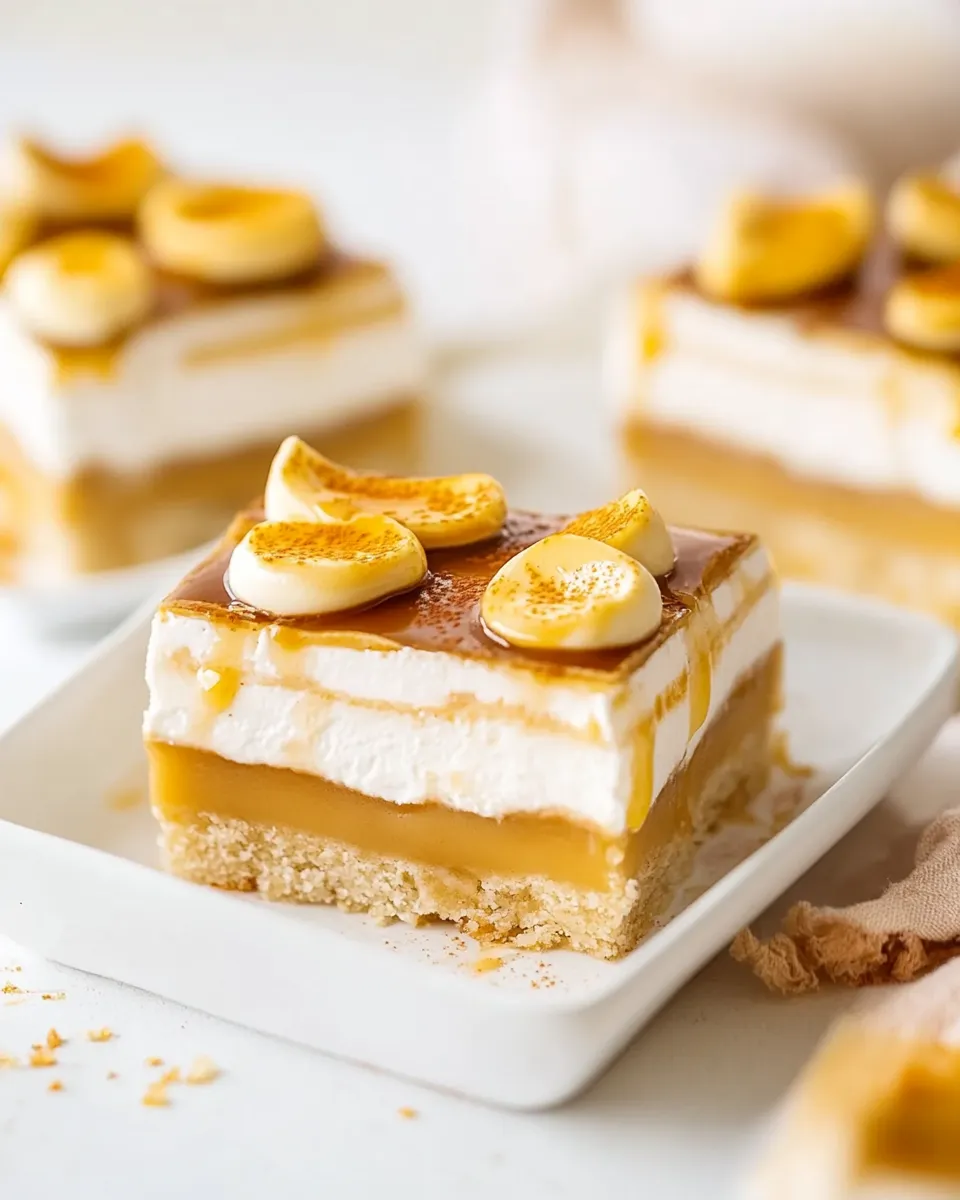
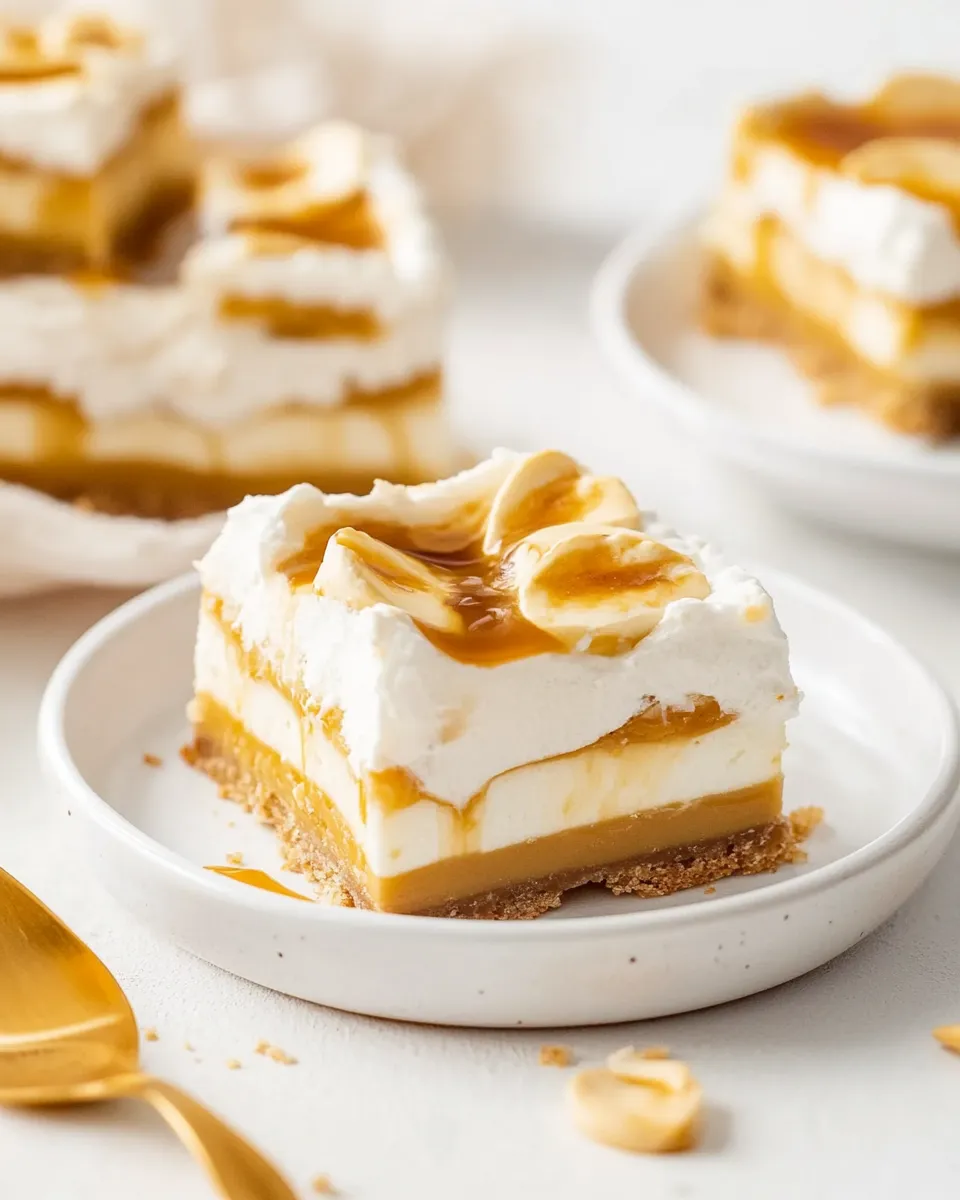
Banoffee Bars Recipe
There’s something truly magical about the combination of bananas, toffee, and a crumbly crust. Banoffee Bars are the perfect dessert for any occasion, blending the rich flavors of banana and caramel in a way that’s both indulgent and delicious. Whether you’re hosting a gathering, looking for a sweet treat to enjoy after dinner, or simply want to treat yourself, this Banoffee Bars recipe is sure to impress. With a buttery crust, creamy filling, and luscious whipped topping, these bars are a delightful twist on the classic banoffee pie. Let’s dive into the details!
What Sets This Recipe Apart
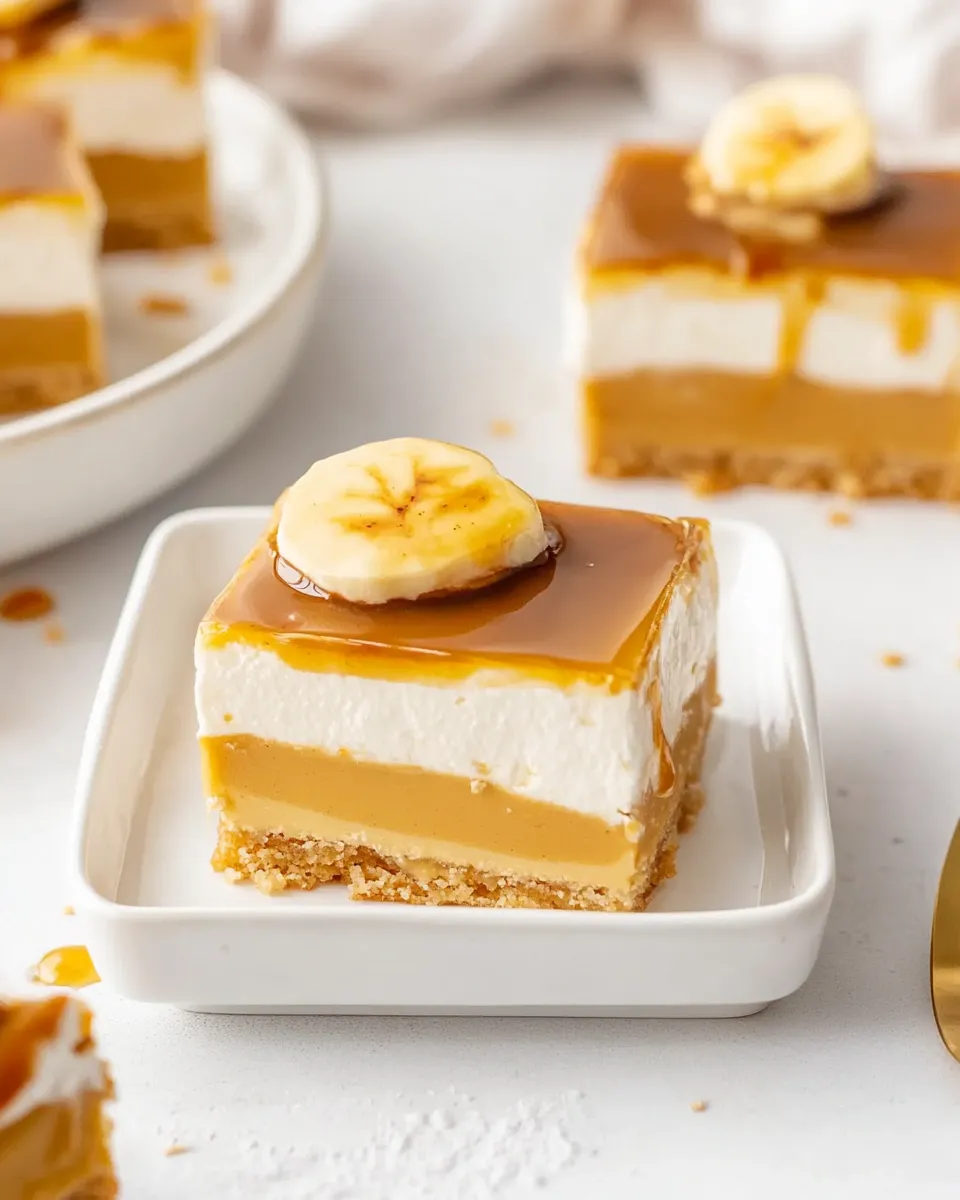
What makes this Banoffee Bars recipe stand out is its simplicity and versatility. Unlike traditional banoffee pie, which can be a bit tricky to assemble, these bars are straightforward and easy to make. The buttery crust serves as the perfect base for a rich layer of sweetened condensed milk toffee, topped with fresh bananas and fluffy whipped cream. Drizzle with caramel sauce for an extra touch of decadence. Plus, they’re easy to cut into squares, making them perfect for sharing.
What You’ll Need
To create these delicious Banoffee Bars, gather the following ingredients:
- 1/2 cup softened butter – This will create a rich and flaky crust.
- 1/2 cup granulated sugar – Adds sweetness to the crust.
- 1 cup all-purpose flour – The base for your crust.
- 1/2 teaspoon vanilla extract – Enhances the flavor of the crust.
- 14 oz sweetened condensed milk (1 can) – The star ingredient for the toffee filling.
- 2 whole ripe bananas – Fresh and sweet, they add a fruity flavor.
- 8 oz whipped cream topping – For that light and airy finish.
- Caramel sauce for drizzling (optional) – For an extra layer of sweetness.
Must-Have Equipment
Before you start baking, make sure you have the right tools on hand:
- Mixing bowl – For blending the crust ingredients.
- 9×9-inch baking pan – The perfect size for these bars.
- Whisk – To mix the ingredients smoothly.
- Spatula – For spreading the filling evenly.
- Knife – To cut the bars into neat squares.
Banoffee Bars Recipe in Steps
Follow these simple steps to whip up your delightful Banoffee Bars:
Step 1: Preheat the Oven
Preheat your oven to 350°F (175°C). This ensures that your bars bake evenly.
Step 2: Prepare the Crust
In a mixing bowl, combine the softened butter, granulated sugar, all-purpose flour, and vanilla extract. Use a whisk or spatula to blend until the mixture is crumbly yet holds together when pressed.
Step 3: Bake the Crust
Press the crust mixture evenly into the bottom of the 9×9-inch baking pan. Bake in the preheated oven for 15-20 minutes, or until the edges are lightly golden. Remove from the oven and allow it to cool completely.
Step 4: Make the Toffee Filling
In a saucepan over medium heat, pour in the sweetened condensed milk. Stir continuously until it thickens and turns a caramel color, about 5-7 minutes. Be careful not to let it burn.
Step 5: Assemble the Bars
Once the crust is cool, pour the toffee filling evenly over the crust. Let it set for a few minutes.
Step 6: Add Bananas
Slice the ripe bananas and layer them over the toffee filling, arranging them evenly across the surface.
Step 7: Top with Whipped Cream
Spread the whipped cream topping over the bananas, smoothing it out with a spatula for an even finish.
Step 8: Drizzle with Caramel Sauce
If desired, drizzle caramel sauce over the whipped cream for an extra sweet touch.
Step 9: Chill and Cut
Refrigerate the bars for at least 2 hours to allow them to set. Once firm, cut into squares and serve. Enjoy your delicious Banoffee Bars!
Seasonal Serving Ideas
These Banoffee Bars are perfect for any time of the year, but here are some seasonal serving ideas to make them even more special:
- Summer Picnics: Serve them chilled at outdoor gatherings.
- Fall Gatherings: Pair with warm apple cider for a cozy treat.
- Winter Holidays: Add festive sprinkles or chocolate shavings on top.
- Spring Celebrations: Serve with fresh berries for a colorful touch.
Errors to Dodge
While making these Banoffee Bars, keep the following tips in mind to ensure success:
- Overbaking the crust: Keep an eye on the crust to avoid it becoming too hard.
- Skipping the chilling time: Allowing the bars to set properly is crucial for easy cutting.
- Using unripe bananas: Choose ripe bananas for the best flavor and sweetness.
- Not stirring the toffee: Continuous stirring is key to prevent burning.
Storing Tips & Timelines
To keep your Banoffee Bars fresh and delicious, follow these storage tips:
- Refrigeration: Store in an airtight container in the fridge for up to 5 days.
- Freezing: These bars can be frozen for up to 3 months. Just ensure they are well-wrapped.
- Thawing: When ready to enjoy, thaw in the refrigerator overnight before serving.
Reader Q&A
Can I use a different type of fruit instead of bananas?
Absolutely! While bananas are traditional, you can experiment with other fruits like strawberries or peaches for a different flavor profile.
Is it necessary to use sweetened condensed milk?
For the best toffee flavor, sweetened condensed milk is recommended. However, you can try alternatives like coconut milk for a different twist.
Can I make these bars gluten-free?
Yes! Substitute the all-purpose flour with a gluten-free flour blend, and you’ll have a delicious gluten-free treat.
What can I use instead of whipped cream topping?
If you prefer a lighter option, you can use a homemade whipped coconut cream or a yogurt-based topping for a healthier alternative.
Bring It to the Table
These Banoffee Bars are sure to become a favorite in your dessert repertoire. Whether you’re enjoying them at home or sharing them with friends, their creamy, sweet, and buttery flavors will delight everyone. The best part? They’re incredibly easy to make, so you can whip them up whenever a craving strikes!
Indulge in this delicious Banoffee Bars recipe, and let the flavors take you on a sweet journey. Happy baking!
Banoffee Bars Recipe
Ingredients
Equipment
Method
- Step 1: Preheat your oven to 350°F (175°C) to ensure even baking.
- Step 2: In a mixing bowl, combine the softened butter, granulated sugar, flour, and vanilla extract. Blend until crumbly.
- Step 3: Press the mixture into the bottom of the baking pan. Bake for 15-20 minutes, until edges are golden. Let cool completely.
- Step 4: In a saucepan, heat the sweetened condensed milk over medium heat, stirring until thickened and caramel in color (about 5-7 minutes).
- Step 5: Pour the toffee filling evenly over the cooled crust and let set for a few minutes.
- Step 6: Slice the bananas and layer them over the toffee filling evenly.
- Step 7: Spread the whipped cream topping over the bananas for an even finish.
- Step 8: Drizzle caramel sauce over the whipped cream if desired.
- Step 9: Refrigerate for at least 2 hours to set, then cut into squares and serve.
Notes
- Store in an airtight container in the fridge for up to 5 days.
- Freeze for up to 3 months, ensuring they're well-wrapped.
- Thaw in the refrigerator overnight before serving.