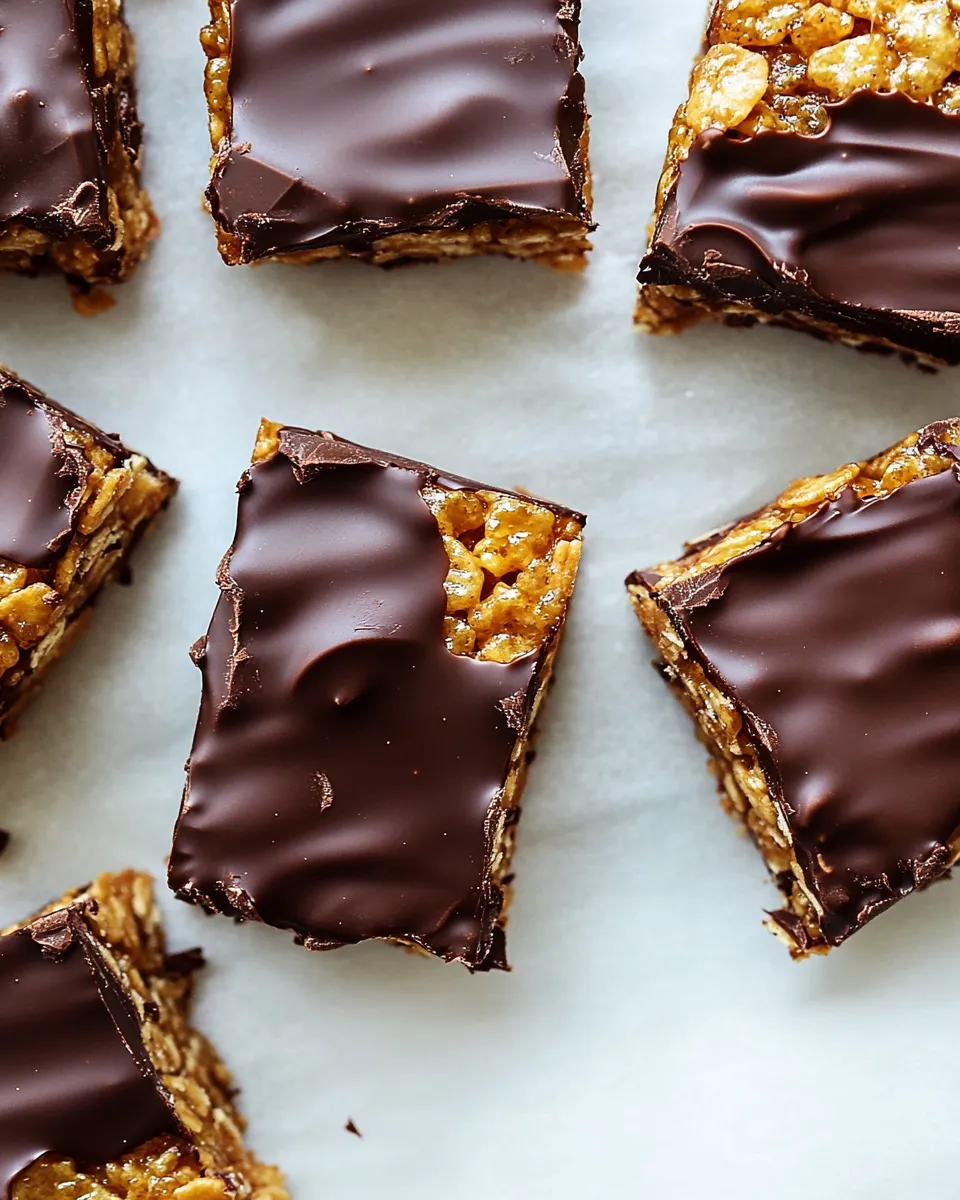
Chocolate Covered Brown Butter Krispie Treats.
In the world of desserts, few treats can rival the nostalgic charm of crispy rice bars. But when you take these classic snacks and elevate them with the nutty richness of brown butter, creamy peanut butter, and a luscious chocolate coating, you arrive at something truly extraordinary: Chocolate Covered Brown Butter Krispie Treats. These delightful bites are not just a sweet treat; they are a celebration of flavors and textures that will make your taste buds dance with joy. Perfect for parties, after-school snacks, or even just a little indulgence, these treats are bound to be a hit with everyone who tries them.
The Upside of Chocolate Covered Brown Butter Krispie Treats.

There’s something undeniably marvelous about the combination of crunchy, chewy, and creamy in Chocolate Covered Brown Butter Krispie Treats. The rich, buttery flavor from the brown butter pairs perfectly with the sweet and nutty notes of peanut butter and honey. The addition of chocolate not only adds a decadent layer but also makes these treats visually appealing. They are incredibly easy to make, requiring minimal ingredients and effort, which is perfect for anyone looking to whip up a quick and satisfying dessert. Plus, they have the added bonus of being customizable, allowing you to experiment with different toppings or mix-ins.
Ingredient Breakdown
To make your own Chocolate Covered Brown Butter Krispie Treats, you’ll need the following ingredients:
- 1 stick (8 tablespoons) salted butter: This is the star of our show, bringing in that delicious brown butter flavor.
- 1/3 cup honey: Adds natural sweetness and a hint of floral flavor.
- 1/3 cup real maple syrup: Provides depth and a unique sweetness that pairs beautifully with the other ingredients.
- 1 cup creamy peanut butter: Offers a nutty richness that complements the crispy rice perfectly.
- 5 1/3 cups brown rice Krispies: The base of our treats, providing that delightful crunch.
- 8-12 ounces semi-sweet or dark chocolate, melted: The ultimate finishing touch that makes these treats irresistible.
- 20-24 pretzel twists: Adds a fun crunch and a hint of saltiness to balance the sweetness.
Gear Up: What to Grab
Before you get started, make sure you have the following kitchen gear on hand:
- Large mixing bowl: For combining the ingredients.
- Wooden spoon or spatula: Ideal for mixing and folding the treats.
- 9×13 inch baking dish: Perfect size for setting the treats.
- Double boiler or microwave-safe bowl: For melting the chocolate safely.
- Parchment paper: To line your baking dish for easy removal of the treats.
- Knife or pizza cutter: For cutting the finished treats into squares or rectangles.
Mastering Chocolate Covered Brown Butter Krispie Treats.: How-To

Now that you have everything ready, it’s time to create these delicious Chocolate Covered Brown Butter Krispie Treats. Follow these steps for perfect results:
Step 1: Brown the Butter
In a medium saucepan over medium heat, melt the salted butter. Continue cooking the butter, stirring frequently, until it turns a golden brown color and develops a nutty aroma. This process usually takes about 5-7 minutes. Be careful not to burn it!
Step 2: Mix in Sweeteners and Peanut Butter
Once the butter is browned, remove it from the heat. Stir in the honey, maple syrup, and creamy peanut butter until fully combined and smooth.
Step 3: Combine with Rice Krispies
In a large mixing bowl, add the brown rice Krispies. Pour the warm peanut butter mixture over the cereal and mix well until all the Krispies are evenly coated.
Step 4: Press into Baking Dish
Line a 9×13 inch baking dish with parchment paper for easy removal. Pour the mixture into the dish and use a spatula or your hands (lightly greased) to press it down evenly. Make sure it’s compacted well.
Step 5: Chill and Prepare Chocolate
Place the baking dish in the refrigerator for about 30 minutes to firm up. Meanwhile, melt your chocolate using a double boiler or in the microwave in 30-second intervals, stirring until smooth.
Step 6: Coat with Chocolate
Once the Krispie treats are firm, remove them from the fridge. Cut them into squares or rectangles as desired. Dip each piece into the melted chocolate, allowing any excess to drip off before placing them on a cooling rack or parchment paper.
Step 7: Top with Pretzels
While the chocolate is still wet, gently press a pretzel twist on top of each treat for that extra crunch and a lovely salty-sweet contrast.
Step 8: Let Set
Allow the chocolate to set completely at room temperature or in the fridge for a quicker result. Once set, they are ready to be enjoyed!
Better-for-You Options

If you’re looking to make some swaps for a healthier version of Chocolate Covered Brown Butter Krispie Treats, consider the following options:
- Nut butter swap: Use almond butter or sunflower seed butter instead of peanut butter for a different flavor or nut-free option.
- Sweetener alternatives: Use agave syrup or coconut nectar in place of honey for a vegan twist.
- Dark chocolate: Opt for dark chocolate with a higher cocoa content for less sugar and a richer flavor.
- Gluten-free cereal: Make sure to choose certified gluten-free brown rice Krispies if necessary.
Frequent Missteps to Avoid
Creating the perfect Chocolate Covered Brown Butter Krispie Treats can be easy, but here are some common mistakes to steer clear of:
- Overcooking the butter: Watch the butter closely while browning to prevent it from burning.
- Not pressing firmly enough: Make sure to pack the mix tightly in the baking dish to prevent your treats from crumbling.
- Skipping the chill time: Don’t rush this step! Chilling helps the treats set properly.
- Using cold chocolate: Ensure your chocolate is warm and smooth when dipping; cold chocolate can cause it to crack.
Prep Ahead & Store
These Chocolate Covered Brown Butter Krispie Treats are great for meal prep! Here’s how to store them:
You can prepare them a day in advance and store them in an airtight container in the refrigerator for up to one week. If you want to keep them even longer, you can freeze them for up to three months. Just make sure to separate layers with parchment paper to avoid sticking. When you’re ready to enjoy, simply thaw them in the fridge for a few hours before serving.
Popular Questions
Can I use other cereals instead of brown rice Krispies?
Absolutely! Feel free to experiment with different cereals, like cornflakes or puffed rice, to create your own unique version of these treats.
What can I use instead of peanut butter?
If you have nut allergies or prefer a different flavor, try using almond butter, sunflower seed butter, or even a soy nut butter for a similar texture and taste.
Can I make these vegan?
Yes! Simply substitute the butter with a vegan butter alternative, use maple syrup as your sweetener, and choose vegan chocolate for coating.
How do I know when my chocolate is melted perfectly?
The chocolate should be smooth and pourable without any lumps. If using a microwave, melt in short increments and stir in between to avoid overheating.
Hungry for More?
If you loved these Chocolate Covered Brown Butter Krispie Treats, you’ll want to check out more of our delightful dessert recipes. From decadent brownies to fruity parfaits, there’s something for everyone. Don’t forget to share your creations with friends and family, because these treats are best enjoyed together!
There you have it—a deliciously indulgent recipe for Chocolate Covered Brown Butter Krispie Treats that is sure to satisfy your sweet tooth. Whether you’re treating yourself or sharing with loved ones, these treats are a delightful way to enjoy a classic dessert with a twist. Happy baking!
Chocolate Covered Brown Butter Krispie Treats.
Ingredients
Equipment
Method
- In a medium saucepan over medium heat, melt the salted butter. Continue cooking until it turns golden brown and develops a nutty aroma (5-7 minutes).
- Remove the butter from heat and stir in honey, maple syrup, and peanut butter until smooth.
- In a large mixing bowl, add the brown rice Krispies and pour the warm peanut butter mixture over them. Mix until evenly coated.
- Line a 9x13 inch baking dish with parchment paper. Pour the mixture into the dish and press it down evenly using a spatula or greased hands.
- Chill in the refrigerator for about 30 minutes to firm up. Meanwhile, melt your chocolate using a double boiler or microwave.
- Once firm, cut the treats into squares or rectangles. Dip each piece into melted chocolate, allowing excess to drip off.
- While the chocolate is wet, gently press a pretzel twist on top of each treat.
- Let the chocolate set at room temperature or in the fridge before enjoying.
Notes
- Use almond or sunflower seed butter for a nut-free option.
- Experiment with different cereals for a unique twist.
- Store in an airtight container in the fridge for up to a week.