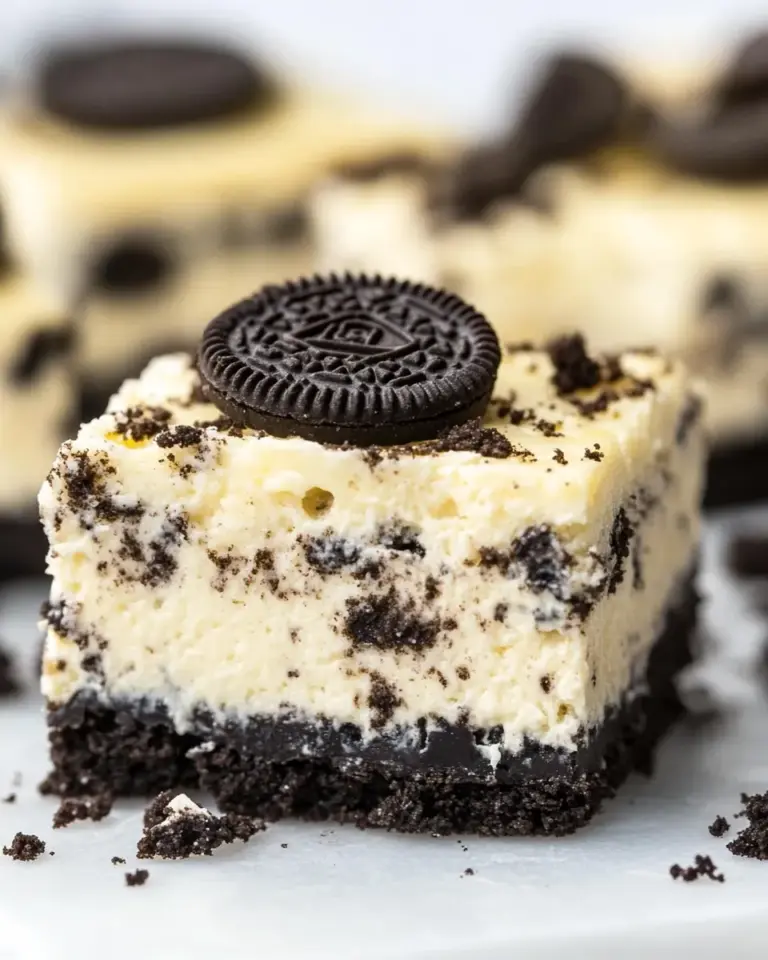
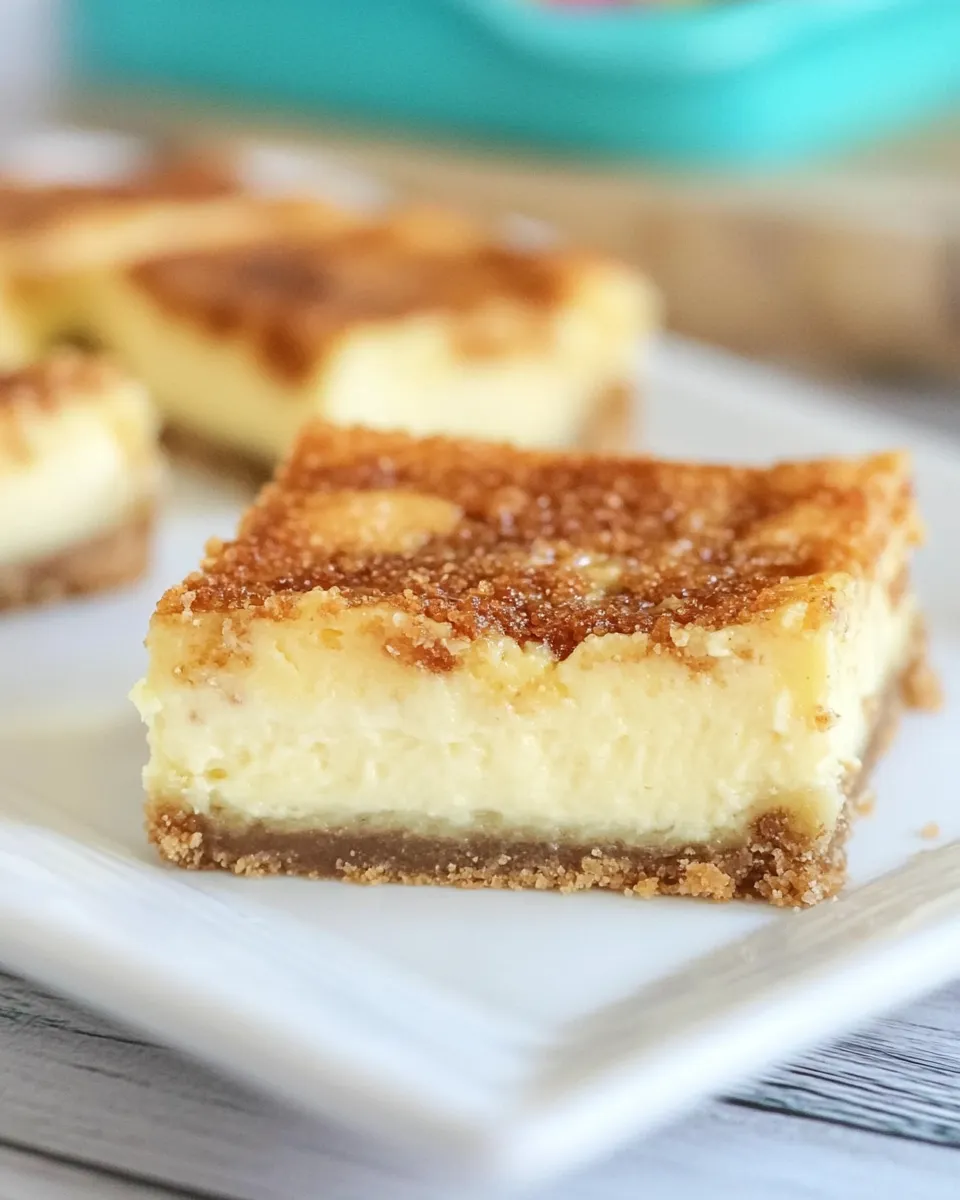
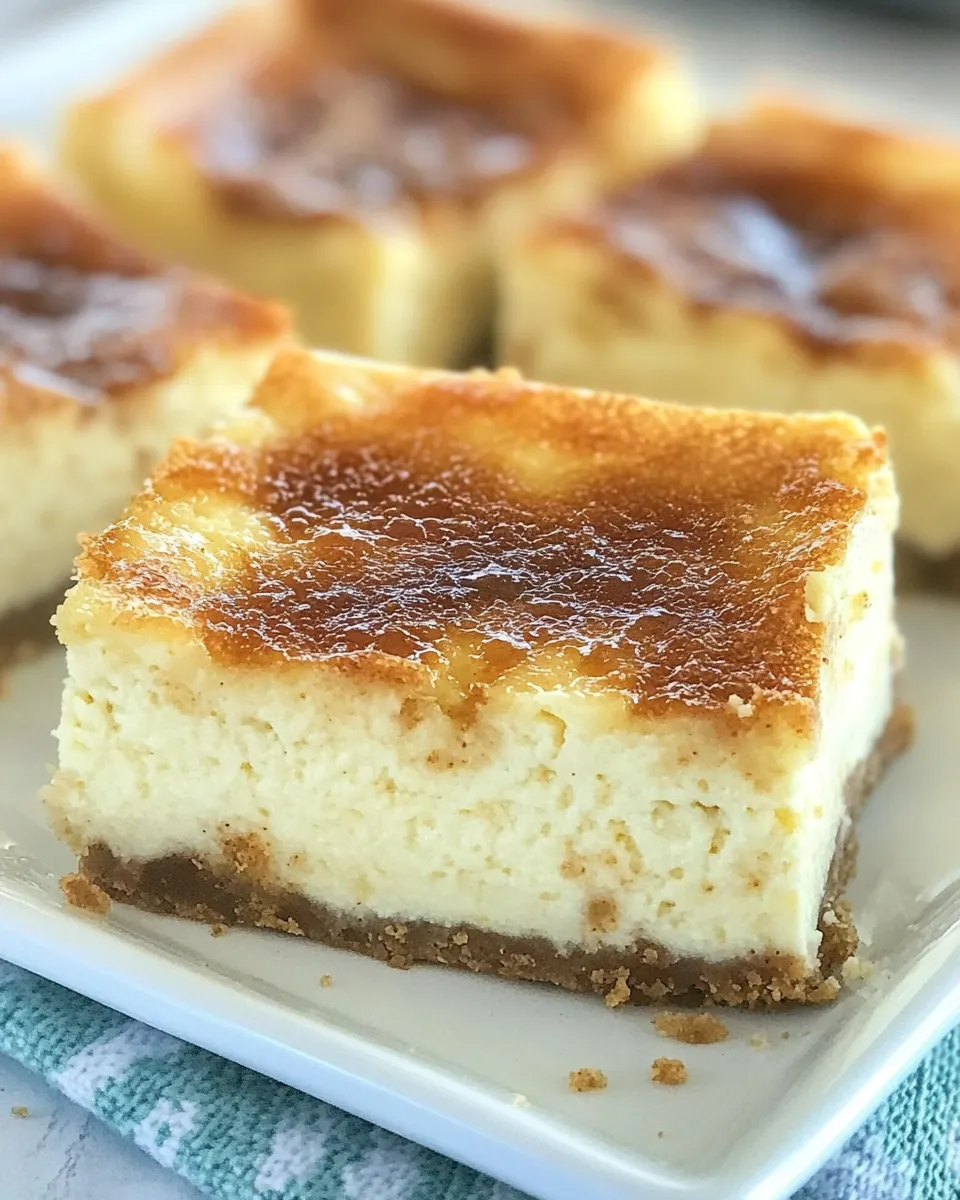
Creme Brulee Cheesecake Bars
If you’re a fan of creamy desserts that leave a lasting impression, then you’re in for a treat with these Creme Brulee Cheesecake Bars. Imagine the rich, velvety texture of cheesecake, combined with the delightful crunch of a cookie base, and topped off with a luscious layer reminiscent of the classic creme brulee. This dessert not only looks elegant but also brings a delightful balance of flavors and textures that will leave your guests asking for seconds. Let’s dive into this decadent recipe that is perfect for any occasion!
Why This Recipe Is Reliable
These Creme Brulee Cheesecake Bars are straightforward to make, even for novice bakers. Each component is simple, and by following the step-by-step instructions, you’ll achieve a dessert that’s as beautiful as it is delicious. The combination of a cookie base with a creamy cheesecake filling ensures that every bite is a perfect balance of sweetness and texture. Whether you are preparing for a special event or simply indulging yourself, this recipe is bound to impress.
What Goes In
- For the cookie base:
- 1/4 cup butter, softened
- 1/3 cup granulated sugar
- 2 tablespoons brown sugar
- 1 egg
- 1 teaspoon vanilla extract
- 1 teaspoon baking soda
- 1 box (3.4 ounces) instant vanilla pudding mix (not sugar-free)
- 1 cup flour
- For the cheesecake and topping:
- 4 ounces low-fat cream cheese, softened (regular fat can also be used)
- 1 cup non-fat plain Chobani Greek Yogurt
- 1 egg
- 1 teaspoon vanilla extract
- 1/4 cup granulated sugar
- 1 tablespoon flour
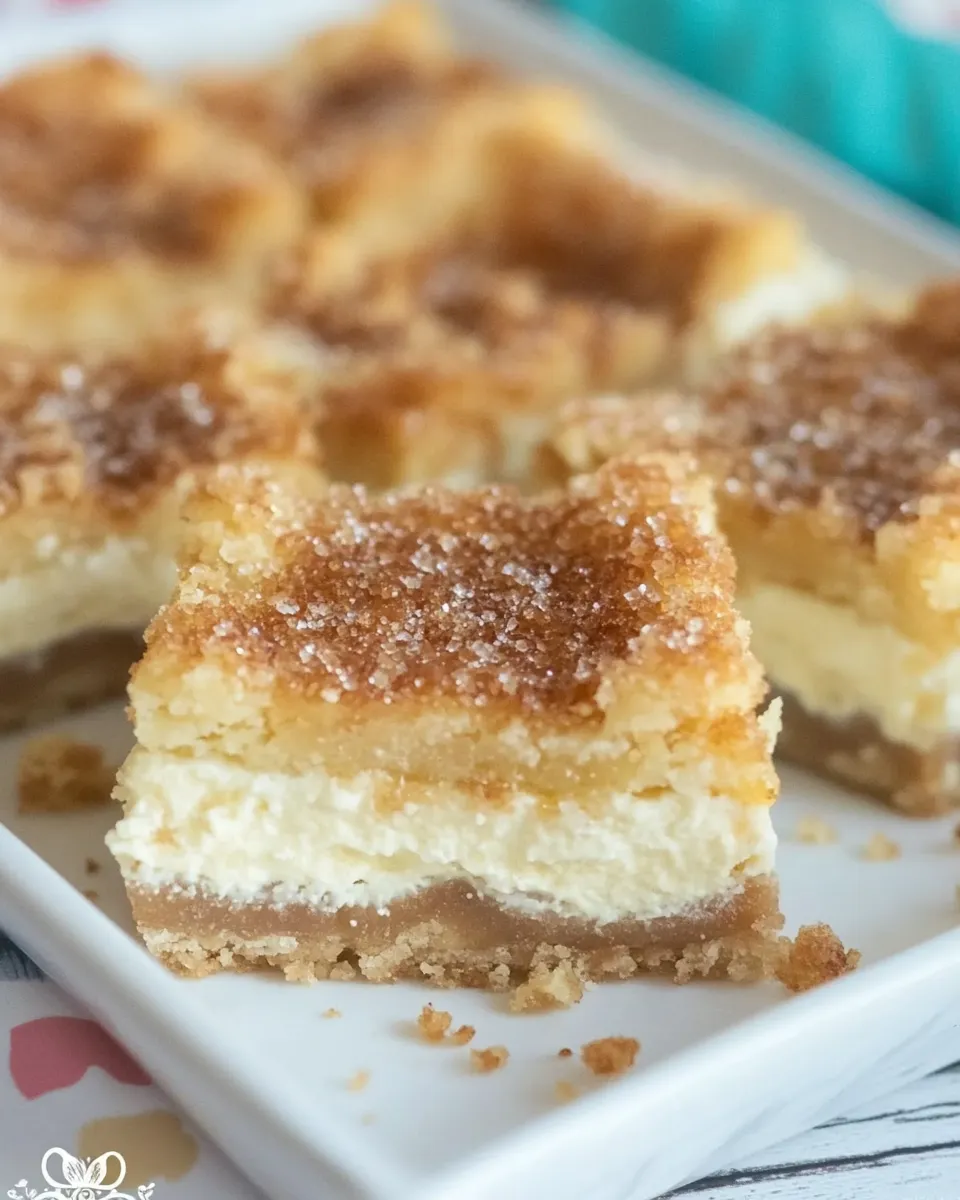
- 1/2 cup toffee bits, semi-crushed
Prep & Cook Tools
- Mixing bowls – For combining your ingredients.
- Electric mixer – To easily cream the butter and sugars together.
- Baking pan (9×9-inch) – To bake your cheesecake bars in.
- Parchment paper – For easy removal of the bars after baking.
- Spatula – To spread the cheesecake mixture evenly.
- Measuring cups and spoons – For accurate ingredient measurements.
Stepwise Method: Creme Brulee Cheesecake Bars
Step 1: Prepare the Cookie Base
In a mixing bowl, combine the softened butter, granulated sugar, and brown sugar. Use an electric mixer to cream them together until light and fluffy. This should take about 2-3 minutes.
Step 2: Add Egg and Vanilla
Add one egg and the teaspoon of vanilla extract to the butter-sugar mixture. Mix until well combined.
Step 3: Combine Dry Ingredients
In a separate bowl, whisk together the baking soda, instant vanilla pudding mix, and flour. Gradually add this dry mixture to the wet ingredients, mixing until just combined.
Step 4: Bake the Cookie Base
Preheat your oven to 350°F (175°C). Line the baking pan with parchment paper, leaving some overhang for easy removal later. Spread the cookie dough evenly across the bottom of the pan. Bake for 10-12 minutes, or until the edges are lightly golden. Allow it to cool slightly while you prepare the cheesecake filling.
Step 5: Prepare the Cheesecake Filling
In a clean mixing bowl, beat the softened cream cheese until smooth. Add the Greek yogurt, egg, vanilla extract, granulated sugar, and flour. Mix until all ingredients are fully incorporated and the mixture is creamy.
Step 6: Add Toffee Bits
Gently fold in the semi-crushed toffee bits into the cheesecake mixture, ensuring they are evenly distributed.
Step 7: Assemble and Bake
Pour the cheesecake filling over the cooled cookie base, spreading it evenly. Bake the entire pan for an additional 25-30 minutes, or until the center is set and no longer jiggly.
Step 8: Cool and Chill
Once baked, remove the cheesecake bars from the oven and allow them to cool at room temperature. Once cooled, refrigerate for at least 4 hours or overnight for the best texture and flavor.
Easy Ingredient Swaps

- Butter: Use coconut oil or margarine as a dairy-free alternative.
- Granulated Sugar: Substitute with coconut sugar for a more natural sweetener.
- Low-fat Cream Cheese: Opt for dairy-free cream cheese if desired.
- Greek Yogurt: Any plain yogurt can be used, including dairy-free options.
Avoid These Traps
- Overmixing: When combining the cheesecake filling, mix just until combined to keep it light and creamy.
- Skipping the Chill: Allowing the cheesecake bars to chill is key for the best texture. Don’t rush this step!
- Not Using Parchment: Lining your pan with parchment paper ensures easy removal after baking.
- Checking for Doneness: Keep an eye on your bars while baking; if they puff up and are set in the center, they are done!
Freezer-Friendly Notes
These Creme Brulee Cheesecake Bars can be frozen for future enjoyment! Once they have completely cooled, cut them into squares and wrap each piece tightly in plastic wrap. Place them in an airtight container or freezer bag. They can be stored in the freezer for up to 3 months. When you’re ready to enjoy them, simply thaw in the refrigerator overnight.
Quick Questions
Can I use a different flavor of pudding mix?
Absolutely! While vanilla is traditional, you can experiment with other flavors like chocolate or butterscotch for a unique twist.
How do I know when my cheesecake bars are done?
Look for a slight jiggle in the center, but the edges should be set. They will continue to firm up as they cool.
Can I make these ahead of time?
Yes! These cheesecake bars can be made a day in advance. Just cover them properly and store them in the refrigerator until you’re ready to serve.
What’s the best way to serve these bars?
These bars are delicious on their own, but for an extra touch, you can serve them with a dollop of whipped cream or a sprinkle of additional toffee bits on top!
Save & Share
If you love these Creme Brulee Cheesecake Bars as much as we do, be sure to share the recipe with your friends and family. They’ll appreciate the rich flavor and delightful texture, and you’ll be the star of the dessert table!
The perfect balance of creamy, crunchy, and sweet, these Creme Brulee Cheesecake Bars are not just a treat for the taste buds but also a visual delight. With simple ingredients and an easy-to-follow recipe, you’ll find yourself making these bars time and time again. So gather your ingredients, roll up your sleeves, and prepare to indulge in a dessert that is sure to impress. Enjoy!
Creme Brulee Cheesecake Bars
Ingredients
Equipment
Method
- Step 1: Prepare the Cookie Base - In a mixing bowl, combine the softened butter, granulated sugar, and brown sugar. Use an electric mixer to cream them together until light and fluffy. This should take about 2-3 minutes.
- Step 2: Add Egg and Vanilla - Add one egg and the teaspoon of vanilla extract to the butter-sugar mixture. Mix until well combined.
- Step 3: Combine Dry Ingredients - In a separate bowl, whisk together the baking soda, instant vanilla pudding mix, and flour. Gradually add this dry mixture to the wet ingredients, mixing until just combined.
- Step 4: Bake the Cookie Base - Preheat your oven to 350°F (175°C). Line the baking pan with parchment paper, leaving some overhang for easy removal later. Spread the cookie dough evenly across the bottom of the pan. Bake for 10-12 minutes, or until the edges are lightly golden. Allow it to cool slightly while you prepare the cheesecake filling.
- Step 5: Prepare the Cheesecake Filling - In a clean mixing bowl, beat the softened cream cheese until smooth. Add the Greek yogurt, egg, vanilla extract, granulated sugar, and flour. Mix until all ingredients are fully incorporated and the mixture is creamy.
- Step 6: Add Toffee Bits - Gently fold in the semi-crushed toffee bits into the cheesecake mixture, ensuring they are evenly distributed.
- Step 7: Assemble and Bake - Pour the cheesecake filling over the cooled cookie base, spreading it evenly. Bake the entire pan for an additional 25-30 minutes, or until the center is set and no longer jiggly.
- Step 8: Cool and Chill - Once baked, remove the cheesecake bars from the oven and allow them to cool at room temperature. Once cooled, refrigerate for at least 4 hours or overnight for the best texture and flavor.
Notes
- For a dairy-free option, substitute butter with coconut oil.
- Experiment with different pudding flavors for a unique twist.
- Allow the bars to chill overnight for the best texture.