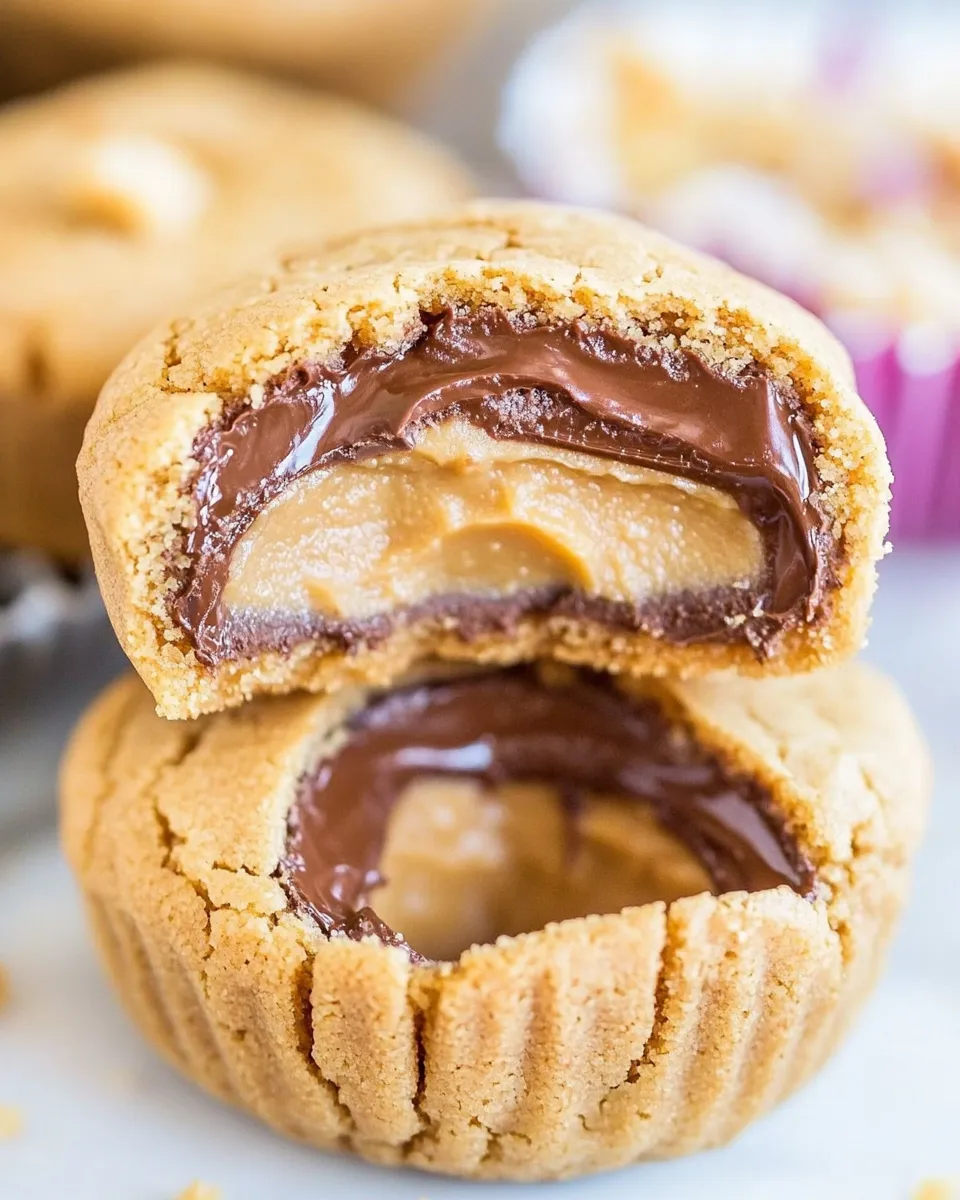
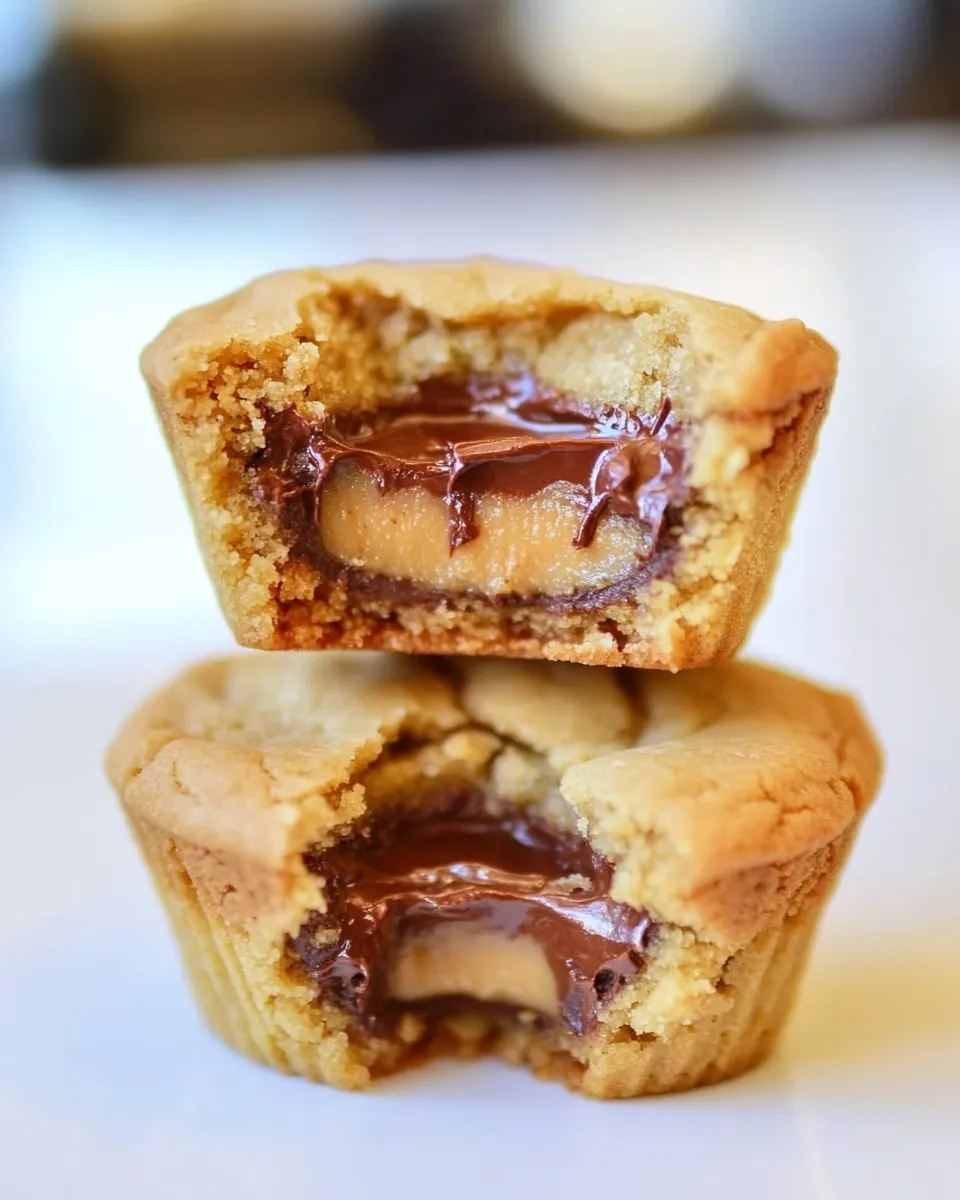
Dark Chocolate Peanut Butter-Stuffed Peanut Butter Cookie Cups
If you’re a fan of the classic combination of chocolate and peanut butter, then you are in for a treat! These Dark Chocolate Peanut Butter-Stuffed Peanut Butter Cookie Cups are a delightful twist on a beloved classic. Imagine a soft and chewy peanut butter cookie cup filled with a luscious dark chocolate peanut butter spread. This recipe is not only easy to follow but also incredibly satisfying to make and eat. Perfect for parties, special occasions, or just because you deserve a sweet treat, these cookie cups will have you coming back for more.
Why I Love This Recipe
There’s something undeniably comforting about cookies, especially when they’re stuffed with a rich, creamy filling. What I love most about this recipe is its simplicity and the balance of flavors. The peanut butter cookie base is soft and slightly salty, creating the perfect backdrop for the sweet, decadent dark chocolate peanut butter filling. Each bite is a delightful surprise, blending the nutty flavor of peanut butter with the richness of dark chocolate. Plus, they are a hit with both kids and adults alike, making them an ideal treat for any occasion.
The Essentials
To make these delightful Dark Chocolate Peanut Butter-Stuffed Peanut Butter Cookie Cups, you will need the following ingredients:
- 1 large egg – This helps to bind the cookie dough and gives it a nice structure.
- 1 cup Skippy Roasted Honey Nut Creamy Peanut Butter – The star of the show, providing that rich peanut flavor.
- 1 cup unsalted butter, softened – Adds moisture and richness to the cookies.
- 1 cup light brown sugar, packed – For a subtle molasses flavor and chewiness.
- 1 cup granulated sugar – Sweetens the cookies perfectly.
- 2 teaspoons vanilla extract – Enhances the overall flavor profile.
- 1 ½ cups all-purpose flour – The base of your cookie dough.
- 1 teaspoon baking soda – Helps the cookies rise and become fluffy.
- Pinch of salt, optional and to taste – Balances the sweetness.
- 12 rounded teaspoons Skippy Natural Dark Chocolate Peanut Butter Spread – The decadent filling that takes these cookie cups over the top.
Equipment & Tools
Before you start baking, gather the following equipment:
- Mixing bowls – For combining your ingredients.
- Measuring cups and spoons – Precision is key in baking!
- Electric mixer or whisk – To cream the butter and sugars together.
- Cookie scoop – For evenly portioning the dough.
- Muffin tin – This will shape your cookie cups.
- Baking sheet – For any leftover cookie dough.
- Cooling rack – To let your cookie cups cool properly.
Dark Chocolate Peanut Butter-Stuffed Peanut Butter Cookie Cups in Steps

Step 1: Preheat Your Oven
Start by preheating your oven to 350°F (175°C). This ensures that your cookies bake evenly.
Step 2: Prepare the Muffin Tin
Grease your muffin tin or line it with paper liners to prevent sticking. This will make it easier to remove the cookie cups once they’re baked.
Step 3: Cream the Butter and Sugars
In a large mixing bowl, cream together the softened unsalted butter, light brown sugar, and granulated sugar using an electric mixer until the mixture is light and fluffy. This should take about 3-5 minutes.
Step 4: Add the Peanut Butter and Egg
Add the Skippy Roasted Honey Nut Creamy Peanut Butter, egg, and vanilla extract to the creamed mixture. Mix until well combined.
Step 5: Combine Dry Ingredients
In a separate bowl, whisk together the all-purpose flour, baking soda, and optional pinch of salt. Gradually add the dry ingredients to the wet mixture, mixing until just combined to avoid overworking the dough.
Step 6: Scoop the Dough
Using a cookie scoop, portion out the dough and place a scoop into each muffin cup. Gently press the dough down to form a cup shape.
Step 7: Fill with Dark Chocolate Peanut Butter
Take the Skippy Natural Dark Chocolate Peanut Butter Spread and place a rounded teaspoonful into the center of each cookie cup.
Step 8: Bake
Bake in the preheated oven for 10-12 minutes, or until the edges are lightly golden. The centers may look slightly underbaked, but they’ll continue to cook as they cool.
Step 9: Cool and Serve
Allow the cookie cups to cool in the pan for about 5 minutes before transferring them to a cooling rack. Enjoy them warm or at room temperature.
Seasonal Spins
These Dark Chocolate Peanut Butter-Stuffed Peanut Butter Cookie Cups can easily be adapted for different seasons or occasions:
- Holiday Spice – Add a dash of cinnamon or nutmeg to the dough for a festive flavor.
- Minty Fresh – Incorporate some peppermint extract or crushed peppermint candies for a refreshing twist during the winter months.
- Nutty Variations – Substitute half of the peanut butter with almond butter or cashew butter for a unique flavor.
- Chocolate Lovers – Fold in some chocolate chips or drizzle melted chocolate on top for extra decadence.
What Could Go Wrong
While this recipe is straightforward, there are a few pitfalls to watch out for:
- Overmixing the Dough – This can lead to tough cookies. Mix until just combined.
- Not Measuring Ingredients Correctly – Baking is a science. Use proper measuring techniques for best results.
- Underbaking – Keep an eye on your cookies; they should be slightly soft in the center but not raw.
- Sticking to the Pan – If you don’t use enough grease or liners, the cookie cups may stick. Ensure proper preparation.
Shelf Life & Storage
To keep your Dark Chocolate Peanut Butter-Stuffed Peanut Butter Cookie Cups fresh, follow these storage tips:
Store them in an airtight container at room temperature for up to 5 days. If you want to keep them longer, you can freeze the cookie cups. Place them in a single layer on a baking sheet until frozen, then transfer them to a freezer-safe container or bag. They can be frozen for up to 3 months. Thaw at room temperature before enjoying!
Troubleshooting Q&A
What should I do if my cookie cups spread too much?
If your cookie cups spread too much, it may be due to the butter being too soft or not enough flour. Make sure your butter is softened but not melted, and ensure you’re measuring your flour accurately.
Can I make the dough ahead of time?
Yes, you can prepare the dough in advance! Chill it in the refrigerator for up to 24 hours before baking. This helps enhance the flavors and control spreading.
How can I tell when my cookie cups are done baking?
Look for edges that are lightly golden and a center that is set but still soft. They will firm up as they cool, so don’t worry if they seem a bit underbaked when you take them out.
Can I use another brand of peanut butter?
While Skippy is my favorite for this recipe, you can use any creamy peanut butter. Just make sure it’s not too oily or runny, as this can affect the texture of your cookie cups.
Wrap-Up
These Dark Chocolate Peanut Butter-Stuffed Peanut Butter Cookie Cups are sure to become a favorite in your home. With their rich flavors and soft texture, they’re perfect for sharing or indulging in all on your own. The combination of chocolate and peanut butter is timeless, and these cookie cups are a delicious way to celebrate that classic pairing. I hope you enjoy making and eating these delightful treats as much as I do!
If you’re ready to bring some joy to your kitchen, gather your ingredients and get started on these Dark Chocolate Peanut Butter-Stuffed Peanut Butter Cookie Cups. Happy baking!

Dark Chocolate Peanut Butter-Stuffed Peanut Butter Cookie Cups
Ingredients
Equipment
Method
- Step 1: Preheat Your Oven. Start by preheating your oven to 350°F (175°C). This ensures that your cookies bake evenly.
- Step 2: Prepare the Muffin Tin. Grease your muffin tin or line it with paper liners to prevent sticking. This will make it easier to remove the cookie cups once they’re baked.
- Step 3: Cream the Butter and Sugars. In a large mixing bowl, cream together the softened unsalted butter, light brown sugar, and granulated sugar using an electric mixer until the mixture is light and fluffy. This should take about 3-5 minutes.
- Step 4: Add the Peanut Butter and Egg. Add the Skippy Roasted Honey Nut Creamy Peanut Butter, egg, and vanilla extract to the creamed mixture. Mix until well combined.
- Step 5: Combine Dry Ingredients. In a separate bowl, whisk together the all-purpose flour, baking soda, and optional pinch of salt. Gradually add the dry ingredients to the wet mixture, mixing until just combined to avoid overworking the dough.
- Step 6: Scoop the Dough. Using a cookie scoop, portion out the dough and place a scoop into each muffin cup. Gently press the dough down to form a cup shape.
- Step 7: Fill with Dark Chocolate Peanut Butter. Take the Skippy Natural Dark Chocolate Peanut Butter Spread and place a rounded teaspoonful into the center of each cookie cup.
- Step 8: Bake. Bake in the preheated oven for 10-12 minutes, or until the edges are lightly golden. The centers may look slightly underbaked, but they'll continue to cook as they cool.
- Step 9: Cool and Serve. Allow the cookie cups to cool in the pan for about 5 minutes before transferring them to a cooling rack. Enjoy them warm or at room temperature.
Notes
- Store cookie cups in an airtight container at room temperature for up to 5 days.
- Freeze cookie cups for up to 3 months; thaw at room temperature before serving.
- Mix until just combined to avoid tough cookies.