Elephant Ears Recipe
Elephant ears are a delightful treat that brings back memories of fun fairs, carnivals, and state fairs. These crispy, sweet pastries are perfect for sharing with family and friends or enjoying as a special dessert. Made from simple ingredients, this Elephant Ears Recipe is incredibly easy to follow, ensuring that you can whip up a batch any time you desire that nostalgic fairground flavor.
Why It Works Every Time

The beauty of this Elephant Ears Recipe lies in its simplicity. With just a few basic ingredients—flour, salt, baking powder, water, and sugar—you can create a dough that is both pliable and easy to roll out. The addition of warm water helps to activate the gluten in the flour, resulting in a light and airy texture. Frying the dough in neutral oil gives it that golden-brown crispy exterior while retaining a soft inside. The final touch of cinnamon and sugar elevates these delightful pastries, making them irresistible!
Ingredient Checklist
- 2 cups all-purpose flour
- 1/4 teaspoon salt
- 1/2 teaspoon baking powder
- 1 cup warm water (or as needed)
- Neutral oil for frying (like canola or vegetable oil)
- 2 1/2 tablespoons granulated sugar
- 2 1/4 teaspoons ground cinnamon
Equipment at a Glance
- Mixing bowl: For combining your dry ingredients and adding water.
- Rolling pin: To roll out the dough into the signature shape.
- Frying pan: For frying the elephant ears to perfection.
- Slotted spoon: To remove the fried pastries from the oil.
- Paper towels: For draining excess oil from the fried elephant ears.
Method: Elephant Ears Recipe
Step 1: Prepare the Dough
In a large mixing bowl, combine the all-purpose flour, salt, and baking powder. Mix these dry ingredients until they are well incorporated. Gradually add warm water, mixing with a spoon or your hands until the dough starts to come together. If the dough is too sticky, add a little more flour; if it’s too dry, add a touch more water.
Step 2: Knead the Dough
Once the dough is formed, transfer it to a lightly floured surface. Knead the dough for about 5-7 minutes until it becomes smooth and elastic. This helps develop the gluten, which contributes to that perfect texture.
Step 3: Rest the Dough
Cover the dough with a clean kitchen towel and let it rest for about 30 minutes. This resting period allows the gluten to relax, making it easier to roll out.
Step 4: Roll Out the Dough
After the dough has rested, divide it into smaller balls, about the size of a tennis ball. On a floured surface, use a rolling pin to flatten each ball into a large, thin circle, approximately 1/8 inch thick. Don’t worry if the shape isn’t perfect; the unique shapes add to their charm!
Step 5: Fry the Elephant Ears
In a frying pan, heat about 1 inch of neutral oil over medium heat. Once the oil is hot (you can test it by dropping a small piece of dough in—if it sizzles, it’s ready), carefully place one rolled-out dough circle into the hot oil. Fry for about 1-2 minutes on each side or until golden brown and crispy.
Step 6: Sugar and Spice
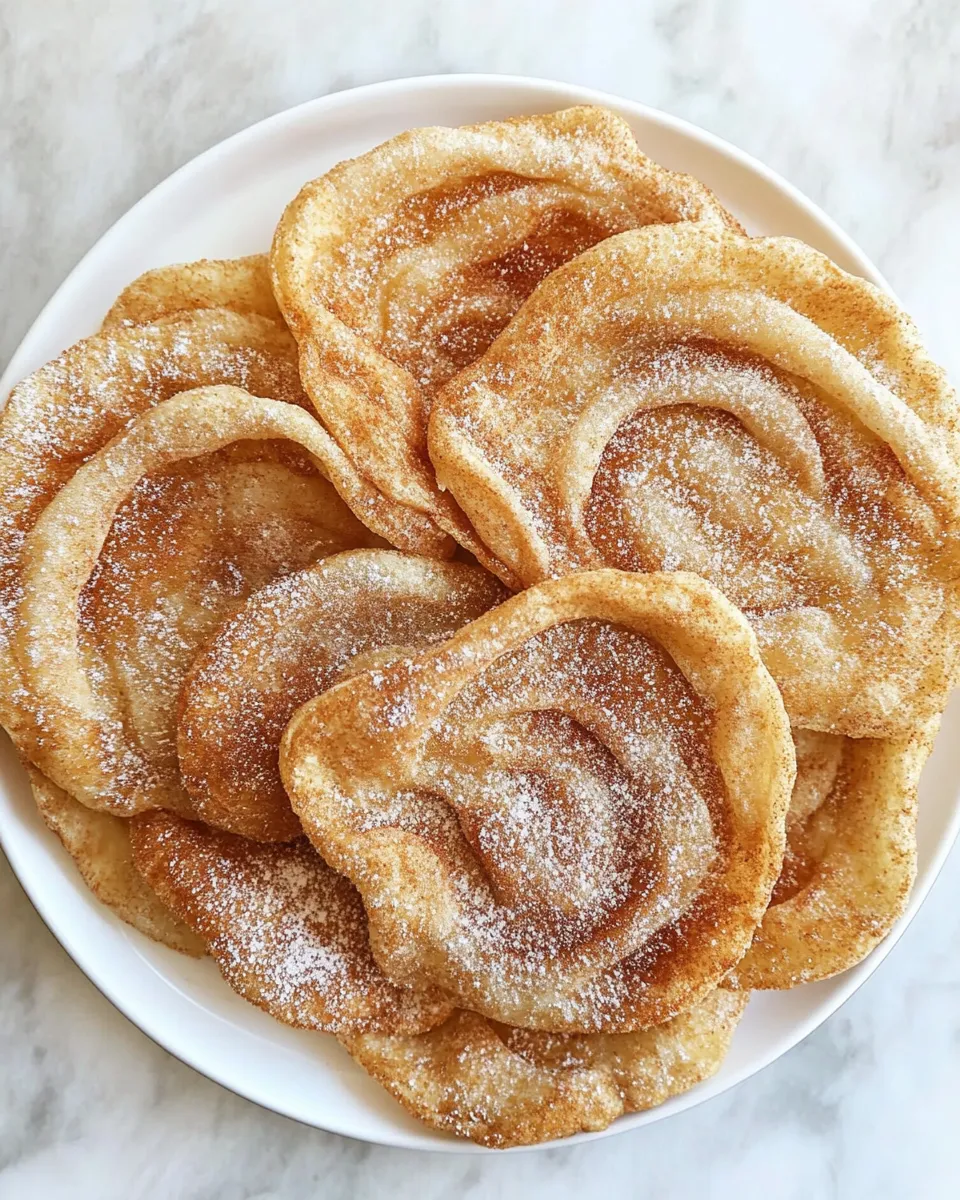
Using a slotted spoon, remove the fried elephant ear from the oil and place it on a paper towel-lined plate to drain excess oil. In a small bowl, mix together the granulated sugar and ground cinnamon. While the elephant ear is still warm, generously sprinkle the cinnamon-sugar mixture over the top.
Step 7: Enjoy!
Serve the elephant ears warm, and watch them disappear quickly! They’re perfect for a snack, dessert, or even a special breakfast treat.
Budget & Availability Swaps

- All-purpose flour: You can substitute with whole wheat flour for a nuttier flavor.
- Neutral oil: If you prefer, you can use coconut oil for a hint of tropical flavor.
- Granulated sugar: Brown sugar can be used for a deeper, molasses-like taste.
- Ground cinnamon: Feel free to experiment with other spices like nutmeg or pumpkin spice for a different twist.
Little Things that Matter
The key to perfect elephant ears is in the frying process. Ensure the oil is hot enough before adding the dough, as too cool oil will make them greasy. Also, remember to not overcrowd the pan; fry in batches to maintain consistent oil temperature. The size of your elephant ears can vary, so adjust cooking time accordingly. Lastly, enjoy them fresh for the best texture and flavor!
How to Store & Reheat
Elephant ears are best enjoyed fresh, but if you have leftovers, store them in an airtight container at room temperature for up to two days. To reheat, place them in a preheated oven at 350°F (175°C) for about 5-7 minutes to restore some crispiness. Avoid microwaving, as this will make them chewy instead of crispy.
Quick Questions
Can I make the dough ahead of time?
Yes! You can prepare the dough and store it in an airtight container in the refrigerator for up to 24 hours. Allow it to come to room temperature before rolling out and frying.
Can I freeze the elephant ears?
Yes, you can freeze the uncooked elephant ears. Lay them flat on a baking sheet, freeze until solid, and then transfer them to a freezer bag. When ready to cook, fry them straight from the freezer, adding a minute or two to the cooking time.
What can I serve with elephant ears?
Elephant ears are delicious on their own, but you can serve them with a side of whipped cream, chocolate sauce, or even a scoop of vanilla ice cream for an indulgent treat!
Can I add toppings to my elephant ears?
Absolutely! Get creative with toppings. Drizzle with caramel sauce, sprinkle with powdered sugar, or even add a layer of Nutella before serving. The possibilities are endless!
Bring It to the Table
Now that you have this delightful Elephant Ears Recipe in your repertoire, you can create memories around the table with family and friends. Whether it’s a weekend treat or a festive occasion, these crispy pastries are sure to please everyone. So fire up that frying pan, gather your loved ones, and enjoy the sweet, warm goodness of homemade elephant ears!
There’s something truly special about sharing food that brings joy and nostalgia. With this Elephant Ears Recipe, you’ll not only be satisfying your sweet tooth but also creating a delightful experience that will keep everyone coming back for more. Happy cooking!

Elephant Ears Recipe
Ingredients
Equipment
Method
- In a large mixing bowl, combine the all-purpose flour, salt, and baking powder. Mix these dry ingredients until well incorporated. Gradually add warm water, mixing until the dough starts to come together.
- Transfer the dough to a lightly floured surface and knead for about 5-7 minutes until smooth and elastic.
- Cover the dough with a clean kitchen towel and let it rest for about 30 minutes.
- Divide the dough into smaller balls and roll each into a large, thin circle, about 1/8 inch thick.
- Heat about 1 inch of neutral oil in a frying pan over medium heat. Fry each dough circle for 1-2 minutes on each side until golden brown.
- Remove the fried elephant ear and place it on a paper towel-lined plate. Mix granulated sugar and ground cinnamon, and sprinkle over the warm pastry.
- Serve warm and enjoy!
Notes
- Fry in batches to maintain oil temperature for crispy results.
- Store leftovers in an airtight container at room temperature for up to two days.
- Reheat in a preheated oven to restore crispiness.