King Cake Poke Cake Recipe
In the heart of Mardi Gras celebrations, the King Cake reigns supreme. This festive treat, with its vibrant colors and delightful flavors, is a beloved tradition. But what if you could encapsulate that joy in a cake that’s not only delicious but also incredibly easy to make? Enter the King Cake Poke Cake Recipe! This cake combines the classic flavors of King Cake with a fun, poke cake twist, making it perfect for parties, family gatherings, or just a sweet treat to enjoy at home. With a simple white cake mix as the base, you’ll be creating a colorful masterpiece that’s sure to impress.
Why King Cake Poke Cake Recipe is Worth Your Time
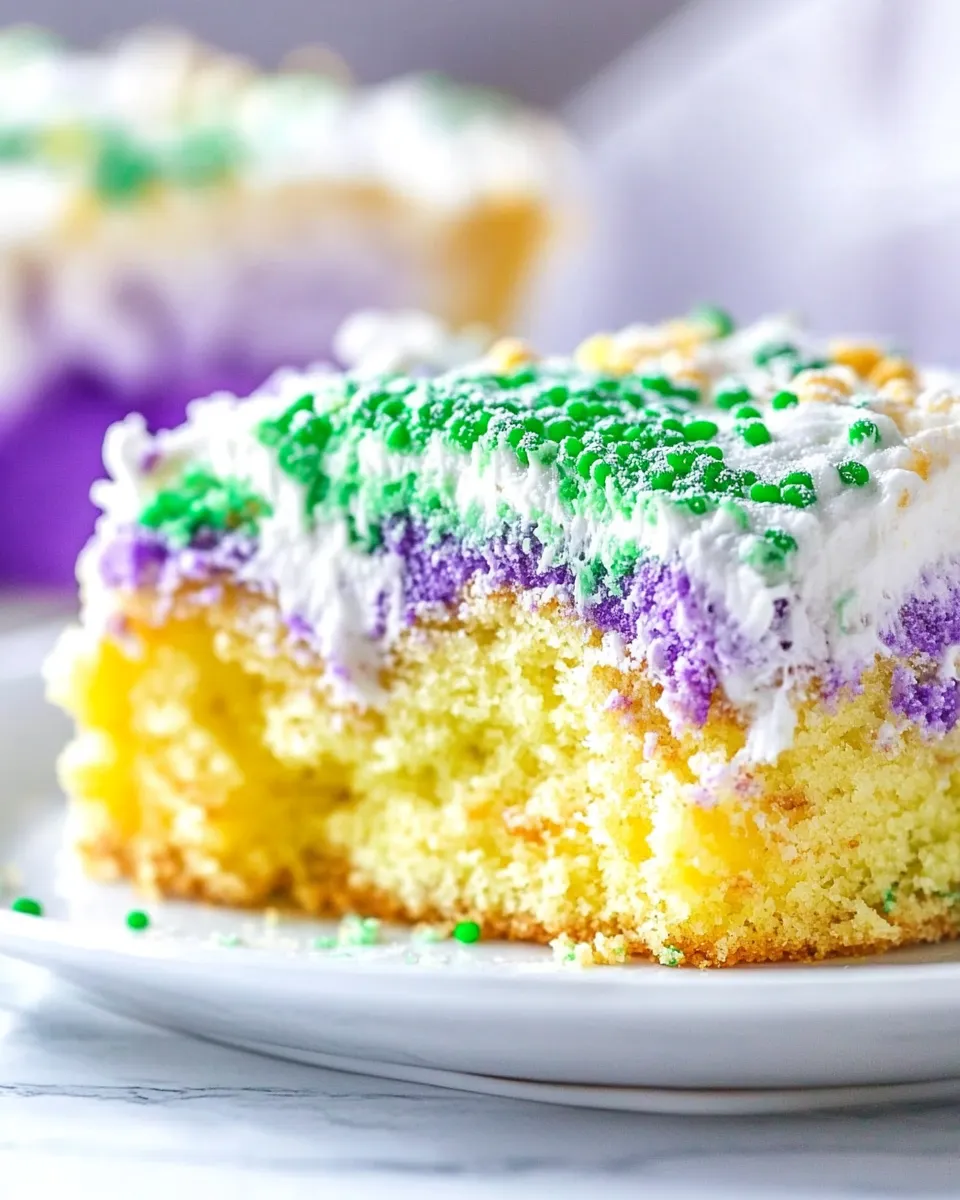
This King Cake Poke Cake Recipe is a delightful mash-up of flavors and textures that brings the festive spirit right to your kitchen. The cake is soft and moist, thanks to the poke method, which allows the creamy fillings to seep into the cake, creating a luscious dessert. The vibrant colors and toppings not only make it visually appealing but also add a fun element to any celebration. Plus, it requires minimal effort, making it perfect for both novice and experienced bakers. You’ll love how the combination of vanilla and banana pudding elevates the flavor, while the whipped topping adds a fluffy finish.
Your Shopping Guide
- 1 package white cake mix: This is the base of your cake; choose a quality brand for the best texture.
- Ingredients needed to prepare the cake mix: Usually, this includes eggs, water, and oil. Check your cake mix package for specifics.
- 2 teaspoons vanilla extract: For that classic vanilla flavor that complements the cake perfectly.
- Bright Green Gel Food Coloring: To give your cake that festive touch.
- Purple Gel Food Coloring: Another essential for achieving the traditional King Cake colors.
- Yellow Gel Food Coloring: The third color to complete your Mardi Gras palette.
- 2 1/2 cups condensed milk: This will add sweetness and moisture to your cake.
- 2 cups white chocolate chips: For a creamy, sweet element that pairs beautifully with the cake.
- 3.4 ounces package vanilla pudding mix: Adds richness and flavor to the filling.
- 3.4 ounces package banana pudding mix: For a twist that enhances the overall taste.
- 4 cups milk: To prepare the puddings; whole milk is recommended for creaminess.
- 8 ounces container whipped topping: For the fluffy, light topping that completes your cake.
- Green, yellow, and purple sprinkles: To decorate your cake and make it festive!
Setup & Equipment
- Mixing bowls: For combining your ingredients smoothly.
- Whisk: Essential for mixing your cake batter and puddings.
- 9×13 inch baking dish: To bake your cake evenly.
- Toothpick or skewer: For poking holes in the cake.
- Spatula: To spread your whipped topping evenly.
- Measuring cups and spoons: For precise ingredient measurements.
King Cake Poke Cake Recipe in Steps
Step 1: Prepare the Cake
Start by preheating your oven to 350°F (175°C). In a large mixing bowl, combine the white cake mix, the ingredients needed to prepare the mix (usually water, oil, and eggs), and 2 teaspoons of vanilla extract. Mix until the batter is smooth and well combined. Pour the batter into a greased 9×13 inch baking dish and bake according to the package instructions, usually about 25-30 minutes, or until a toothpick inserted in the center comes out clean.
Step 2: Cool and Poke
Once baked, remove the cake from the oven and let it cool in the pan for about 10 minutes. After cooling, use a toothpick or skewer to poke holes all over the cake. Make sure to poke deep enough to allow the filling to seep through, but not so deep that the cake falls apart.
Step 3: Prepare the Filling
In a mixing bowl, whisk together the condensed milk, vanilla pudding mix, banana pudding mix, and 4 cups of milk until smooth. The mixture should thicken slightly. Divide the filling into three bowls and add a few drops of each gel food coloring to each bowl: bright green in one, purple in another, and yellow in the last. Stir until the colors are vibrant and well combined.
Step 4: Fill the Poke Cake
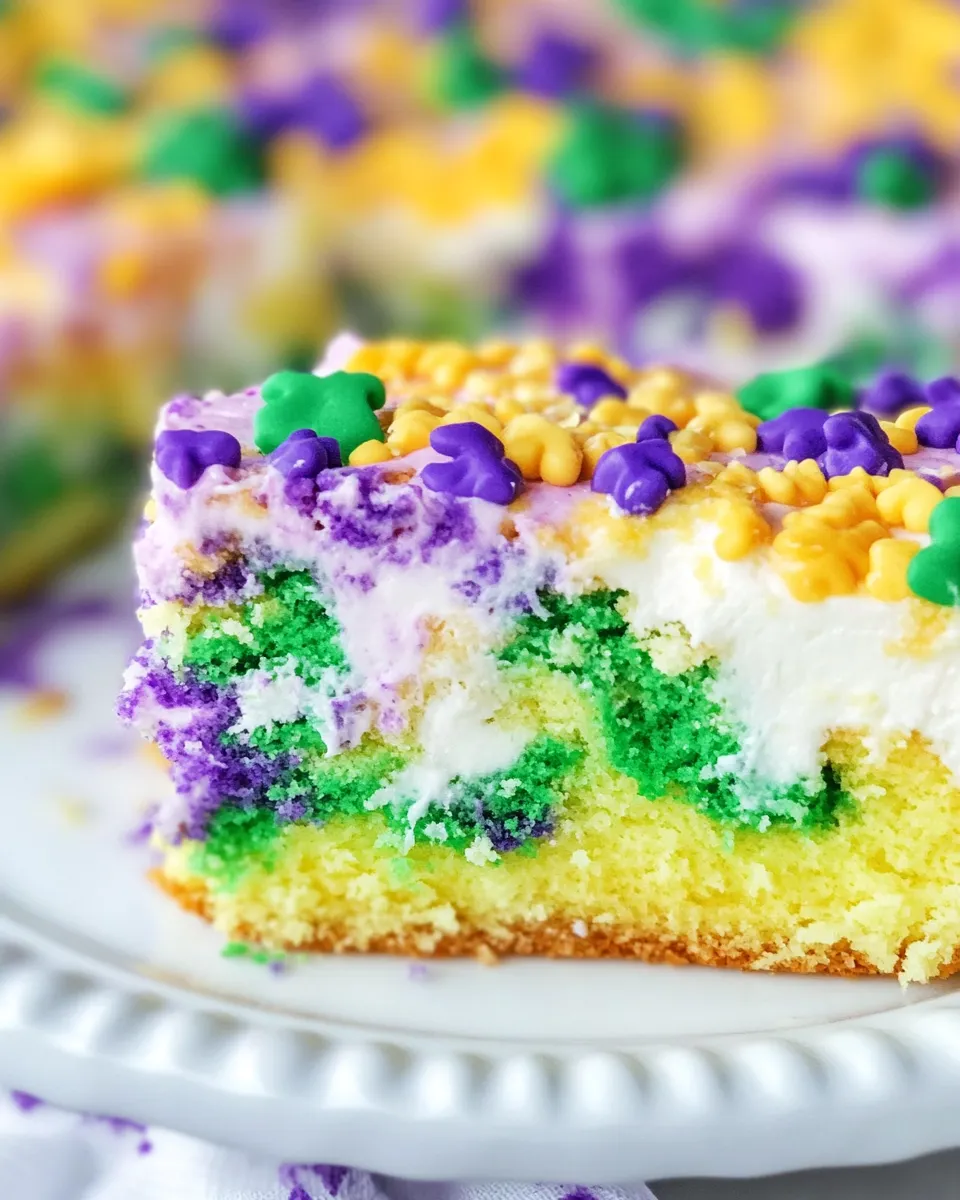
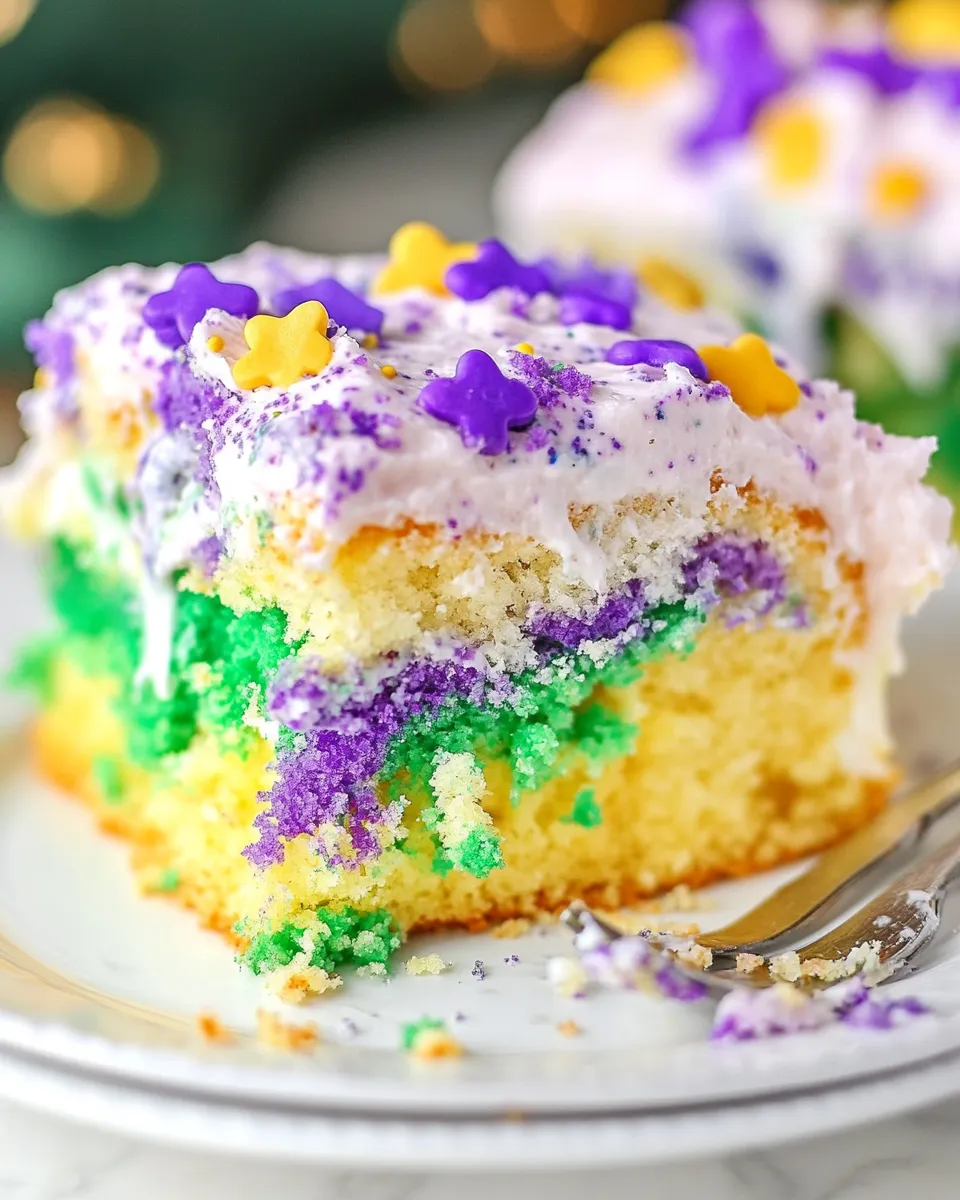
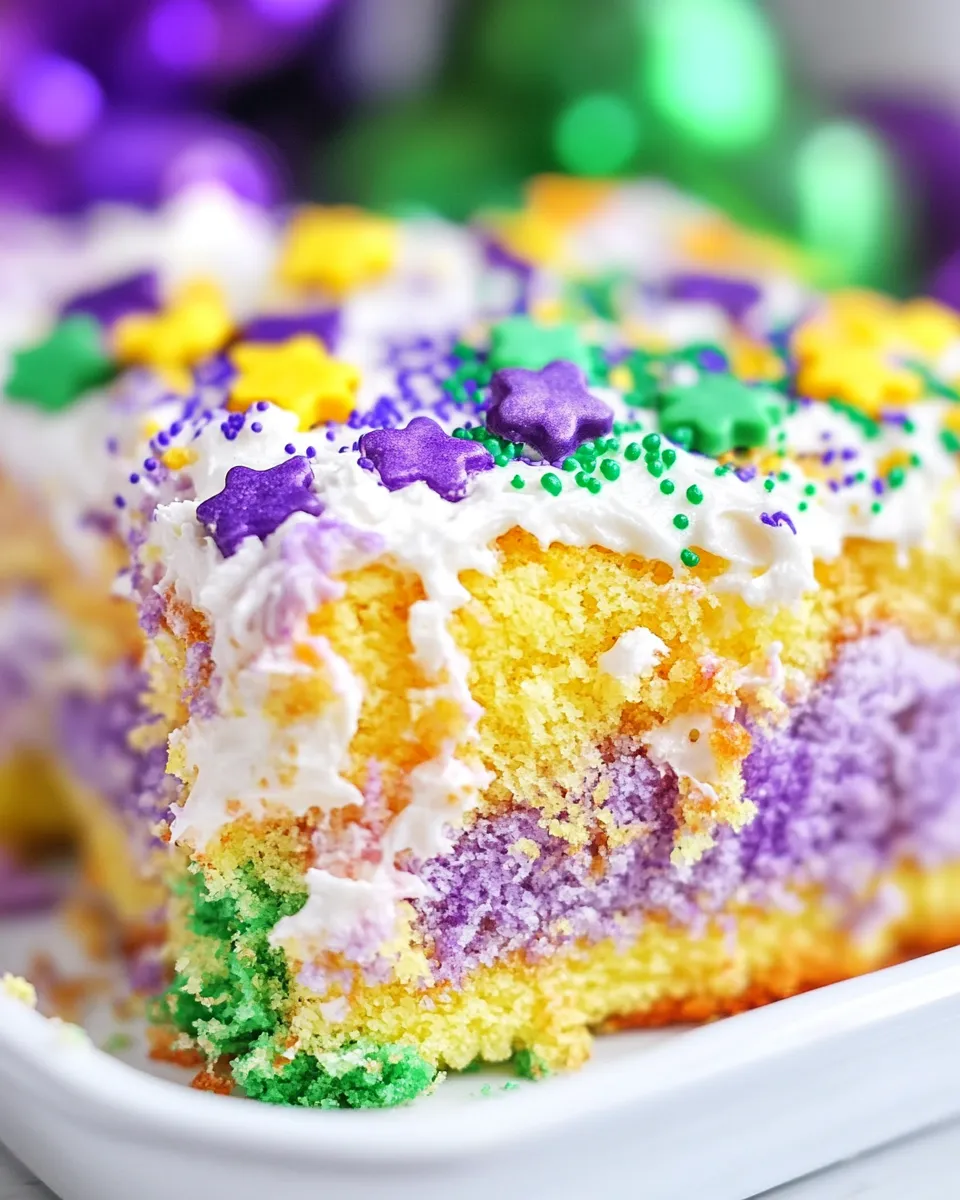
Pour the colored filling into the holes of the cake, alternating colors for a beautiful swirl effect. Let the cake sit for about 30 minutes to allow the filling to soak in and set.
Step 5: Add the Topping
After the cake has set, spread the whipped topping evenly over the entire cake. This adds a light and creamy texture that contrasts beautifully with the moist cake underneath.
Step 6: Decorate
Finish the cake by generously sprinkling green, yellow, and purple sprinkles over the whipped topping. This not only enhances the visual appeal but also adds a delightful crunch.
Step 7: Chill and Serve
Refrigerate the cake for at least 2 hours before serving. This allows the flavors to meld together and the cake to become even more moist. Cut into squares and enjoy the festive celebration of flavors!
Allergy-Friendly Substitutes
- Gluten-Free: Use a gluten-free cake mix and ensure all other ingredients are certified gluten-free.
- Dairy-Free: Substitute the condensed milk with coconut milk or a dairy-free alternative, and use dairy-free whipped topping.
- Egg-Free: Use an egg substitute for the cake mix, such as applesauce or a commercial egg replacer.
- Nut-Free: Ensure all ingredients are nut-free and check for cross-contamination in the brands you choose.
Notes from the Test Kitchen
This King Cake Poke Cake Recipe is versatile and can be adjusted to suit your taste. If you prefer a more pronounced banana flavor, you can increase the banana pudding mix slightly. Additionally, for a fun twist, try adding a layer of cream cheese frosting beneath the whipped topping for added richness. The colors can also be customized; feel free to experiment with different shades to match your celebration theme!
Make Ahead Like a Pro
If you’re planning for a party, this cake is perfect for making ahead of time. You can bake the cake a day in advance and prepare the fillings the day of serving. Just remember to add the whipped topping and sprinkles shortly before you plan to serve the cake to keep them fresh and vibrant. This makes it a stress-free option for busy hosts!
Handy Q&A
Can I use a different cake mix flavor?
Absolutely! While the white cake mix provides a classic base, you can experiment with flavored cake mixes like vanilla or even lemon for a fun twist. Just be mindful that the flavors of the filling should complement the cake flavor.
How long can the King Cake Poke Cake be stored?
The cake can be stored in the refrigerator for up to 5 days. Just make sure it’s covered to maintain freshness. The flavors will continue to develop over time, making it even more delicious!
Can I freeze this cake?
Yes, you can freeze the cake before adding the whipped topping. Wrap it tightly in plastic wrap and then in aluminum foil. When ready to serve, let it thaw in the refrigerator and then add the topping and sprinkles.
What’s the best way to serve this cake?
For a festive touch, serve the cake on a colorful platter and garnish with additional sprinkles or edible gold glitter. It’s a perfect centerpiece for any celebration!
In Closing
This King Cake Poke Cake Recipe is a show-stopping dessert that captures the essence of Mardi Gras in every bite. With its colorful layers, creamy fillings, and fluffy topping, it’s a celebration on a plate. Whether you’re hosting a festive gathering or simply indulging your sweet tooth, this cake is sure to bring smiles and joy. So gather your ingredients, invite your friends, and let the festivities begin! Enjoy each slice of this delightful cake, and may it inspire you to create even more culinary masterpieces in your kitchen.
King Cake Poke Cake Recipe
Ingredients
Equipment
Method
- Step 1: Prepare the Cake - Preheat your oven to 350°F (175°C). In a large mixing bowl, combine the white cake mix, the ingredients needed to prepare the mix, and 2 teaspoons of vanilla extract. Mix until smooth, pour into a greased 9x13 inch dish, and bake according to package instructions, about 25-30 minutes.
- Step 2: Cool and Poke - Remove the cake from the oven and let it cool for about 10 minutes. Use a toothpick or skewer to poke holes all over the cake.
- Step 3: Prepare the Filling - In a mixing bowl, whisk together the condensed milk, vanilla pudding mix, banana pudding mix, and 4 cups of milk until smooth. Divide into three bowls, adding gel food colors to each.
- Step 4: Fill the Poke Cake - Pour the colored filling into the holes of the cake, alternating colors. Let it sit for about 30 minutes.
- Step 5: Add the Topping - Spread the whipped topping evenly over the cake.
- Step 6: Decorate - Sprinkle green, yellow, and purple sprinkles over the topping.
- Step 7: Chill and Serve - Refrigerate for at least 2 hours before serving.
Notes
- For a more pronounced banana flavor, increase banana pudding mix.
- Try adding a layer of cream cheese frosting beneath the whipped topping for richness.
- This cake can be made ahead; just add the topping before serving.